部署客户端渲染(CSR)应用
如果你开发的应用只使用客户端渲染(CSR),并使用 Trunk 作为开发服务器和构建工具,部署过程非常简单。
trunk build --release
trunk build 将会在 dist/ 目录中创建多个构建产物。只需将 dist 发布到某个在线服务器,即可完成应用的部署。这与部署任何 JavaScript 应用的过程非常相似。
我们创建了多个示例仓库,展示了如何将 Leptos 客户端渲染应用部署到不同的托管服务上。
注意:Leptos 不推荐使用任何特定的托管服务,你可以自由选择任何支持静态站点部署的服务。
示例:
Github Pages
将 Leptos 客户端渲染(CSR)应用部署到 Github Pages 非常简单。首先,进入你的 Github 仓库的设置页面,点击左侧菜单中的“Pages”。在页面的“Build and deployment”部分,将“Source”更改为“Github Actions”。然后,将以下内容复制到 .github/workflows/gh-pages-deploy.yml 文件中:
Example
Example
name: Release to Github Pages

on:
  push:
    branches: [main]
  workflow_dispatch:

permissions:
  contents: write # for committing to gh-pages branch.
  pages: write
  id-token: write

# Allow only one concurrent deployment, skipping runs queued between the run in-progress and latest queued.
# However, do NOT cancel in-progress runs as we want to allow these production deployments to complete.
concurrency:
  group: "pages"
  cancel-in-progress: false

jobs:
  Github-Pages-Release:

    timeout-minutes: 10

    environment:
      name: github-pages
      url: ${{ steps.deployment.outputs.page_url }}

    runs-on: ubuntu-latest

    steps:
      - uses: actions/checkout@v4 # repo checkout

      # Install Rust Nightly Toolchain, with Clippy & Rustfmt
      - name: Install nightly Rust
        uses: dtolnay/rust-toolchain@nightly
        with:
          components: clippy, rustfmt

      - name: Add WASM target
        run: rustup target add wasm32-unknown-unknown

      - name: lint
        run: cargo clippy & cargo fmt


      # If using tailwind...
      # - name: Download and install tailwindcss binary
      #   run: npm install -D tailwindcss && npx tailwindcss -i <INPUT/PATH.css> -o <OUTPUT/PATH.css>  # run tailwind


      - name: Download and install Trunk binary
        run: wget -qO- https://github.com/trunk-rs/trunk/releases/download/v0.18.4/trunk-x86_64-unknown-linux-gnu.tar.gz | tar -xzf-

      - name: Build with Trunk
        # "${GITHUB_REPOSITORY#*/}" evaluates into the name of the repository
        # using --public-url something will allow trunk to modify all the href paths like from favicon.ico to repo_name/favicon.ico .
        # this is necessary for github pages where the site is deployed to username.github.io/repo_name and all files must be requested
        # relatively as favicon.ico. if we skip public-url option, the href paths will instead request username.github.io/favicon.ico which
        # will obviously return error 404 not found.
        run: ./trunk build --release --public-url "${GITHUB_REPOSITORY#*/}"


      # Deploy to gh-pages branch
      # - name: Deploy 🚀
      #   uses: JamesIves/github-pages-deploy-action@v4
      #   with:
      #     folder: dist


      # Deploy with Github Static Pages

      - name: Setup Pages
        uses: actions/configure-pages@v4
        with:
          enablement: true
          # token:

      - name: Upload artifact
        uses: actions/upload-pages-artifact@v2
        with:
          # Upload dist dir
          path: './dist'

      - name: Deploy to GitHub Pages 🚀
        id: deployment
        uses: actions/deploy-pages@v3
更多关于部署到 Github Pages 的信息,请参考此示例仓库。
Vercel
第 1 步:设置 Vercel
在 Vercel 的 Web 界面中:
- 创建一个新项目。
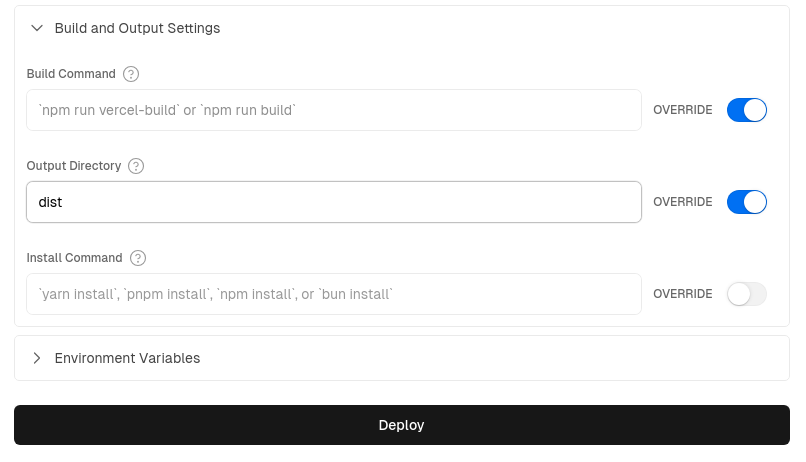
- 确保以下设置正确:
- 将“Build Command”留空并启用 Override。
- 将“Output Directory”更改为
dist(这是 Trunk 构建的默认输出目录)并启用 Override。
第 2 步:为 GitHub Actions 添加 Vercel 凭据
注意:预览和部署操作都需要在 GitHub secrets 中设置 Vercel 凭据。
-
获取你的 Vercel Access Token,进入“Account Settings” > “Tokens”并创建一个新令牌——保存该令牌以便在后续步骤 5 中使用。
-
使用命令
npm i -g vercel安装 Vercel CLI,然后运行vercel login登录到你的账户。 -
在项目文件夹中运行
vercel link创建一个新的 Vercel 项目;在 CLI 中,当被问到“Link to an existing project?”时,回答“是”,然后输入你在步骤 1 中创建的项目名称。此操作将为你生成一个.vercel文件夹。 -
打开生成的
.vercel文件夹中的project.json文件,保存其中的projectId和orgId,以便在下一步使用。 -
在 GitHub 中,进入仓库的“Settings” > “Secrets and Variables” > “Actions”,将以下内容添加为仓库密钥:
- 将你的 Vercel Access Token(步骤 1 中创建的)保存为
VERCEL_TOKEN。 - 将
.vercel/project.json中的projectId保存为VERCEL_PROJECT_ID。 - 将
.vercel/project.json中的orgId保存为VERCEL_ORG_ID。
- 将你的 Vercel Access Token(步骤 1 中创建的)保存为
完整说明请参阅:“如何将 Github Actions 与 Vercel 一起使用”
第 3 步:添加 GitHub Action 脚本
最后,只需将以下两个文件——一个用于部署,另一个用于 PR 预览——复制粘贴到你的 .github/workflows/ 文件夹中,或者从示例仓库的 .github/workflows/ 文件夹中复制它们。完成后,你的下一次提交或 PR 将会自动触发部署。
生产部署脚本:vercel_deploy.yml
Example
Example
name: Release to Vercel

on:
push:
	branches:
	- main
env:
CARGO_TERM_COLOR: always
VERCEL_ORG_ID: ${{ secrets.VERCEL_ORG_ID }}
VERCEL_PROJECT_ID: ${{ secrets.VERCEL_PROJECT_ID }}

jobs:
Vercel-Production-Deployment:
	runs-on: ubuntu-latest
	environment: production
	steps:
	- name: git-checkout
		uses: actions/checkout@v3

	- uses: dtolnay/rust-toolchain@nightly
		with:
		components: clippy, rustfmt
	- uses: Swatinem/rust-cache@v2
	- name: Setup Rust
		run: |
		rustup target add wasm32-unknown-unknown
		cargo clippy
		cargo fmt --check

	- name: Download and install Trunk binary
		run: wget -qO- https://github.com/trunk-rs/trunk/releases/download/v0.18.2/trunk-x86_64-unknown-linux-gnu.tar.gz | tar -xzf-


	- name: Build with Trunk
		run: ./trunk build --release

	- name: Install Vercel CLI
		run: npm install --global vercel@latest

	- name: Pull Vercel Environment Information
		run: vercel pull --yes --environment=production --token=${{ secrets.VERCEL_TOKEN }}

	- name: Deploy to Vercel & Display URL
		id: deployment
		working-directory: ./dist
		run: |
		vercel deploy --prod --token=${{ secrets.VERCEL_TOKEN }} >> $GITHUB_STEP_SUMMARY
		echo $GITHUB_STEP_SUMMARY
预览部署脚本:vercel_preview.yml
Example
Example
# For more info re: vercel action see:
# https://github.com/amondnet/vercel-action

name: Leptos CSR Vercel Preview

on:
pull_request:
	branches: [ "main" ]

workflow_dispatch:

env:
CARGO_TERM_COLOR: always
VERCEL_ORG_ID: ${{ secrets.VERCEL_ORG_ID }}
VERCEL_PROJECT_ID: ${{ secrets.VERCEL_PROJECT_ID }}

jobs:
fmt:
	name: Rustfmt
	runs-on: ubuntu-latest
	steps:
	- uses: actions/checkout@v4
	- uses: dtolnay/rust-toolchain@nightly
		with:
		components: rustfmt
	- name: Enforce formatting
		run: cargo fmt --check

clippy:
	name: Clippy
	runs-on: ubuntu-latest
	steps:
	- uses: actions/checkout@v4
	- uses: dtolnay/rust-toolchain@nightly
		with:
		components: clippy
	- uses: Swatinem/rust-cache@v2
	- name: Linting
		run: cargo clippy -- -D warnings

test:
	name: Test
	runs-on: ubuntu-latest
	needs: [fmt, clippy]
	steps:
	- uses: actions/checkout@v4
	- uses: dtolnay/rust-toolchain@nightly
	- uses: Swatinem/rust-cache@v2
	- name: Run tests
		run: cargo test

build-and-preview-deploy:
	runs-on: ubuntu-latest
	name: Build and Preview

	needs: [test, clippy, fmt]

	permissions:
	pull-requests: write

	environment:
	name: preview
	url: ${{ steps.preview.outputs.preview-url }}

	steps:
	- name: git-checkout
		uses: actions/checkout@v4

	- uses: dtolnay/rust-toolchain@nightly
	- uses: Swatinem/rust-cache@v2
	- name: Build
		run: rustup target add wasm32-unknown-unknown

	- name: Download and install Trunk binary
		run: wget -qO- https://github.com/trunk-rs/trunk/releases/download/v0.18.2/trunk-x86_64-unknown-linux-gnu.tar.gz | tar -xzf-


	- name: Build with Trunk
		run: ./trunk build --release

	- name: Preview Deploy
		id: preview
		uses: amondnet/vercel-action@v25.1.1
		with:
		vercel-token: ${{ secrets.VERCEL_TOKEN }}
		github-token: ${{ secrets.GITHUB_TOKEN }}
		vercel-org-id: ${{ secrets.VERCEL_ORG_ID }}
		vercel-project-id: ${{ secrets.VERCEL_PROJECT_ID }}
		github-comment: true
		working-directory: ./dist

	- name: Display Deployed URL
		run: |
		echo "Deployed app URL: ${{ steps.preview.outputs.preview-url }}" >> $GITHUB_STEP_SUMMARY
查看示例仓库了解更多信息。
Spin - 无服务器 WebAssembly
另一种选择是使用无服务器平台,例如 Spin。尽管 Spin 是开源的,可以在你自己的基础设施上运行(例如 Kubernetes 中),但在生产环境中使用 Spin 最简单的方法是使用 Fermyon Cloud。
首先按照此处的说明安装 Spin CLI,并为你的 Leptos CSR 项目创建一个 Github 仓库(如果尚未创建)。
-
打开“Fermyon Cloud” > “User Settings”。如果未登录,选择“Login With GitHub”按钮。
-
在“Personal Access Tokens”部分,选择“Add a Token”。输入名称“gh_actions”,然后点击“Create Token”。
-
Fermyon Cloud 会显示生成的令牌;点击复制按钮将其复制到剪贴板。
-
打开你的 Github 仓库,进入“Settings” > “Secrets and Variables” > “Actions”,将 Fermyon Cloud 的令牌添加为“Repository secrets”,变量名为
FERMYON_CLOUD_TOKEN。 -
将以下 Github Actions 脚本复制粘贴到
.github/workflows/<SCRIPT_NAME>.yml文件中。 -
启用“预览”和“部署”脚本后,Github Actions 将在每次拉取请求(PR)中生成预览,并在更新主分支时自动部署。
生产部署脚本:spin_deploy.yml
Example
Example
# For setup instructions needed for Fermyon Cloud, see:
# https://developer.fermyon.com/cloud/github-actions

# For reference, see:
# https://developer.fermyon.com/cloud/changelog/gh-actions-spin-deploy

# For the Fermyon gh actions themselves, see:
# https://github.com/fermyon/actions

name: Release to Spin Cloud

on:
push:
	branches: [main]
workflow_dispatch:

permissions:
contents: read
id-token: write

# Allow only one concurrent deployment, skipping runs queued between the run in-progress and latest queued.
# However, do NOT cancel in-progress runs as we want to allow these production deployments to complete.
concurrency:
group: "spin"
cancel-in-progress: false

jobs:
Spin-Release:

	timeout-minutes: 10

	environment:
	name: production
	url: ${{ steps.deployment.outputs.app-url }}

	runs-on: ubuntu-latest

	steps:
	- uses: actions/checkout@v4 # repo checkout

	# Install Rust Nightly Toolchain, with Clippy & Rustfmt
	- name: Install nightly Rust
		uses: dtolnay/rust-toolchain@nightly
		with:
		components: clippy, rustfmt

	- name: Add WASM & WASI targets
		run: rustup target add wasm32-unknown-unknown && rustup target add wasm32-wasi

	- name: lint
		run: cargo clippy & cargo fmt


	# If using tailwind...
	# - name: Download and install tailwindcss binary
	#   run: npm install -D tailwindcss && npx tailwindcss -i <INPUT/PATH.css> -o <OUTPUT/PATH.css>  # run tailwind


	- name: Download and install Trunk binary
		run: wget -qO- https://github.com/trunk-rs/trunk/releases/download/v0.18.2/trunk-x86_64-unknown-linux-gnu.tar.gz | tar -xzf-


	- name: Build with Trunk
		run: ./trunk build --release


	# Install Spin CLI & Deploy

	- name: Setup Spin
		uses: fermyon/actions/spin/setup@v1
		# with:
		# plugins:


	- name: Build and deploy
		id: deployment
		uses: fermyon/actions/spin/deploy@v1
		with:
		fermyon_token: ${{ secrets.FERMYON_CLOUD_TOKEN }}
		# key_values: |-
			# abc=xyz
			# foo=bar
		# variables: |-
			# password=${{ secrets.SECURE_PASSWORD }}
			# apikey=${{ secrets.API_KEY }}

	# Create an explicit message to display the URL of the deployed app, as well as in the job graph
	- name: Deployed URL
		run: |
		echo "Deployed app URL: ${{ steps.deployment.outputs.app-url }}" >> $GITHUB_STEP_SUMMARY
预览部署脚本:spin_preview.yml
Example
Example
# For setup instructions needed for Fermyon Cloud, see:
# https://developer.fermyon.com/cloud/github-actions


# For the Fermyon gh actions themselves, see:
# https://github.com/fermyon/actions

# Specifically:
# https://github.com/fermyon/actions?tab=readme-ov-file#deploy-preview-of-spin-app-to-fermyon-cloud---fermyonactionsspinpreviewv1

name: Preview on Spin Cloud

on:
pull_request:
	branches: ["main", "v*"]
	types: ['opened', 'synchronize', 'reopened', 'closed']
workflow_dispatch:

permissions:
contents: read
pull-requests: write

# Allow only one concurrent deployment, skipping runs queued between the run in-progress and latest queued.
# However, do NOT cancel in-progress runs as we want to allow these production deployments to complete.
concurrency:
group: "spin"
cancel-in-progress: false

jobs:
Spin-Preview:

	timeout-minutes: 10

	environment:
	name: preview
	url: ${{ steps.preview.outputs.app-url }}

	runs-on: ubuntu-latest

	steps:
	- uses: actions/checkout@v4 # repo checkout

	# Install Rust Nightly Toolchain, with Clippy & Rustfmt
	- name: Install nightly Rust
		uses: dtolnay/rust-toolchain@nightly
		with:
		components: clippy, rustfmt

	- name: Add WASM & WASI targets
		run: rustup target add wasm32-unknown-unknown && rustup target add wasm32-wasi

	- name: lint
		run: cargo clippy & cargo fmt


	# If using tailwind...
	# - name: Download and install tailwindcss binary
	#   run: npm install -D tailwindcss && npx tailwindcss -i <INPUT/PATH.css> -o <OUTPUT/PATH.css>  # run tailwind


	- name: Download and install Trunk binary
		run: wget -qO- https://github.com/trunk-rs/trunk/releases/download/v0.18.2/trunk-x86_64-unknown-linux-gnu.tar.gz | tar -xzf-


	- name: Build with Trunk
		run: ./trunk build --release


	# Install Spin CLI & Deploy

	- name: Setup Spin
		uses: fermyon/actions/spin/setup@v1
		# with:
		# plugins:


	- name: Build and preview
		id: preview
		uses: fermyon/actions/spin/preview@v1
		with:
		fermyon_token: ${{ secrets.FERMYON_CLOUD_TOKEN }}
		github_token: ${{ secrets.GITHUB_TOKEN }}
		undeploy: ${{ github.event.pull_request && github.event.action == 'closed' }}
		# key_values: |-
			# abc=xyz
			# foo=bar
		# variables: |-
			# password=${{ secrets.SECURE_PASSWORD }}
			# apikey=${{ secrets.API_KEY }}


	- name: Display Deployed URL
		run: |
		echo "Deployed app URL: ${{ steps.preview.outputs.app-url }}" >> $GITHUB_STEP_SUMMARY
查看示例仓库了解更多信息。